Beaver Tails | master index
|
An essay on the DHC-2 Beaver
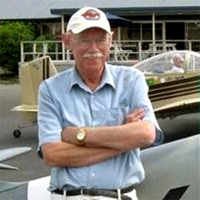
by Mike Feeney, Hamilton, New Zealand
|
|
I am pleased to dedicate this essay to a very dear old chum, the late Dick Beattie. The photograph below and attached is Dick topdressing the hills near Napier, where he was based for many years. Dick attended one of the early Bless you Dick...you brought a lot of laughter and fellowship into many lives.......and certainly taught me some useful stuff about the Beaver those times when we worked two aircraft together when I was just a kid ag. pilot. |
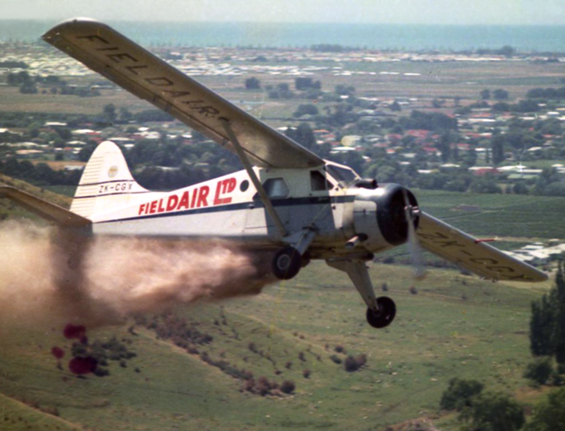
ZK-CGX (1548) near Napier with Dick Beattie at the controls. Photo: Mark Pothan © 1965 - via Graeme Mills |
|
Photo: VH-NOO (1535) Lenn Bayliss © May 2004 (To be continued if you can bear with me...) The de Havilland Canada DHC-2 Beaver..the greatest single-engine 'bush' aircraft ever!
A two-part essay, by Mike Feeney, on the DHC-2 Beaver. Entire books have been written about this aeroplane, and its many roles, so I must stress that this is merely a brief look at the type; but perhaps sufficient to whet the interest of the younger readers. The Google search engine will navigate you into hours of of interesting sites should you wish to learn much more. Just enter "DHC-2 Beaver"..
Please note that this 'Part One' is a revised and expanded version of a piece I wrote a couple of years ago. Notes to the photographs are below the main text for the Email version, and under the images in the www.aerohub.co.nz layout (if using aerohub, click on the image to enlarge)..
**********************************************************************
Wings of Time. Part 1. Development, design, specifications and cockpit.
I am pleased to dedicate this essay to a very dear old chum, the late Dick Beattie.The photograph of ZK-CGX is Dick topdressing the hills near Napier, where he was based for many years. Dick attended one of the early Wanganui Commercial Pilot School courses in the mid-fifties. ('56 or '57 I think?) He then topdressed around Hawke's Bay in Tiger Moths. I first met him when he was flying Ken Fenwick's DH-82 sprayer about the Waikato in '58/'59. Dick was a popular figure at our Waikato Aero Club before he returned to his home region of Hawke's Bay to fly for Fieldair. The fine photo also provides you with a suitable image to study some of the aspects I shall mention.
Bless you Dick...you brought a lot of laughter and fellowship into many lives.......and certainly taught me some useful stuff about the Beaver those times when we worked two aircraft together when I was just a kid ag. pilot.
*********************************************************
The Beaver story really begins when de Havilland established its Canadian subsidiary in 1928 at Downsview, near Toronto. They produced 1,747 Tiger Moths, most of which were the DH-82C for WWII use with enclosed cockpit, brakes and tailwheel. They assembled and marketed various other types such as the 1932 DH-83 Fox Moth which proved to be a useful three or four passenger 'bush' type. During WWII DHC, now a Crown Corporation owned by the Canadian Government, built 1,134 Mosquitos, 500 of which were shipped or flown to the UK. Immediately after the war, they produced 53 DH-83 Fox Moths as a light bush-plane,many of which were fitted with a large 'Ambulance' door on the port side.
As WWII was drawing to a close, DHC had to decide on some home-grown post-war projects. Their first, the DHC-1 Chipmunk for the RCAF, RAF and numerous other military and civil users proved to be a popular success. DHC then decided to design a "bush" machine to compete with and gradually replace pre-war types such as the 1937 Noorduyn Norseman and various Fairchild and other machines. They were fortunate to have a notable bush pilot, Punch Dickens, as their Director of Sales. After much consultation with operators, pilots, maintenance engineers and Provincial Govt. agencies, they considered the resulting 'must-have' and 'wish list'. Many items were obvious and sensible. A high wing for ease of loading, docking with various wind directions and to provide adequate wingtip clearance for curved take-off operations. Many pilots were strongly in favour of air-cooled radial engines to eliminate possible cooling system problems in freezing weather. Two cockpit and a large cabin door on both sides for docking from either direction was essential. The door width had to accept a standard 50 US gallon fuel drum being rolled up planks. Many favoured the aircraft's fuel tanks to be in the belly for ease of refueling whilst standing on a float. This also made it feasable to rig a hose in order to tranfer fuel into a tank from drums whilst in flight; greatly extending range. Three drums of fuel doubled its range. There were many other detail items.
They settled on a design somewhat smaller and lighter than the popular 600 bhp, 7,400 lb (3,356 kg) Norseman. In September 1946, and now knowing what pilots and companies needed, a design team led by Phil Garratt set to work on the drawings for the new all-metal aircraft.
The protype first flew from Downsview on August 16th, 1947 and the first production aircraft was delivered to the Ontario Dept. of Lands and Forests about eight months later.
DHC were perhaps taking a financial risk and sales were slow as the Beaver was new and, naturally, rather pricy as compared with second-hand aircraft. But the company received a massive boost when, at the outbreak of the Korean War, the US Army selected the DHC-2 as its future light transport and ordered large numbers of L-20s. Soon the Beaver could be seen seen all over the non-communist world. Even the British Army ordered them!
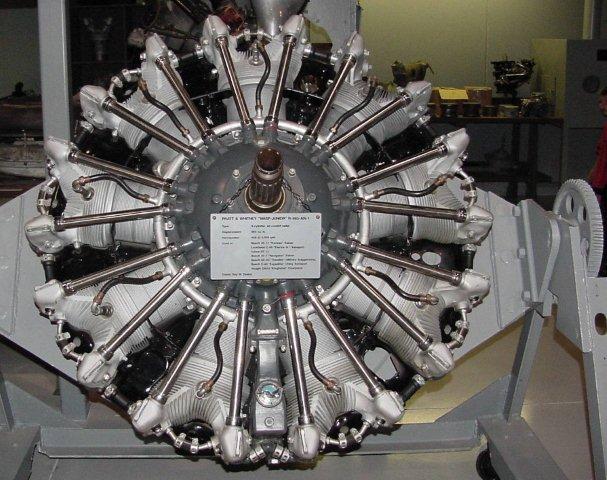
The powerplant: Initially British engines, such as the DH Gipsy Queen, were considered but more power was required so they chose to use the well-proven Pratt & Whitney nine-cylinder air-cooled, direct-drive radial R-985 Wasp Junior of 450 bhp. A radial suited the wide airframe well and enabled a robust and compact engine-bearer frame. Here is some basic data about the "985" (I can't recall anyone who flew the Beaver calling it the 'Wasp Junior').
Due to mass wartime production, this unit was available in large numbers and was cheap. From the initial 300 bhp model in 1930, 39,037 were produced and powered at least 36 production aircraft types. In the mid 1930s, some geared 600 bhp 'Special' or 'Experimental' variants were built but never went into production; being used for air-racing. The vast majority were the 450 bhp model The motor has a General Electric, single-stage, gear-driven centrifugal supercharger rotating at ten times crankshaft speed which increases take-off manifold pressure to 36.5" or more, depending on pressure altitude. The bore and stroke of 5 & 3/16" (132mm) results in a capacity of 985 cubic inches. This is 16.14 litres which is equal to eight typical four-cylinder car motors. With a compression ratio of only 6.00:1 and a red-line rpm of a modest 2,300, the 985 is a low-stressed engine. Its dry weight is 640 lb (290 kg); about one-eighth of the Beaver's normal take-off weight...pretty good for the period. The 600 bhp P&W R-1340 'Wasp' could have been used but is much heavier and would have provided no real advantage in such a relatively small airframe and at the generally lowish density altitudes in which most Beavers were to spend their working lives.
The valve-gear is simple; just two overhead operated by enclosed pushrods. Take-off power is 450 at 2,300 rpm with max. continuous being 400 at 2,200 rpm. This can be maintained up to 5,000 feet. I used to use a Climb power of 30" manifold pressure and 2,000 rpm which, from memory, produces about 320 bhp.
The airframe: The fuselage is a robust conventional semi-monocoque stressed skin square box-section structure, tapering aft of the cabin, and can be readily fitted with floats, skis or wheels to suit seasonal and locality requirements. The 48 foot wing span, high aspect ratio wing's area is quite small at 250 square feet, but it is fitted with excellent slotted flaps to enhance short landing and take-off performance and to provide a lowish stall speed of just under 50 knots in the landing configuration at max. weight (I am a tad hazy about that figure).
The ailerons droop as flap is manually pumped down to a ratio of 1:3 and to a max. deflection of 15 deg. An old myth that the Beaver cannot be taken-off with zero flap is untrue. However, you better have plenty of airstrip ahead as you will need to accelerate to almost best rate-of-climb speed and be rather careful not to attempt to drag it off prematurely. Zero-flap landings are also feasable. I have done only a few and it felt slightly weird!
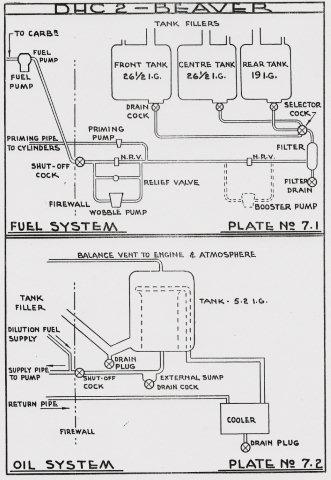
Fuel is carried in three fuselage tanks installed below the cabin which greatly facilitates refueling into the left lower fuselage fillers which are covered by a flap. No clambering up onto the wing in sub-zero conditions! The Front and Centre tanks each hold 29 Imp. gallons and the Rear 19. A fuel system drawing I have shows the Front and Centre usable capacities as 26.5 gallons. Both Les Marshall and I are sceptical about that figure. For aerial topdressing operations, the Centre tank is removed to fit the hopper-box. Optional are wing-tip tanks of about 19 gallons which may be transferred to the Front tank when airspace permits.. The 5.2 gallon oil-tank filler is located inside the cockpit on the passenger's side; a real boon in cold weather. (some are modified to have the filler outside) An oil dilution system, using Avgas, is also fitted with its control also in the cockpit. An engine fire-warning and extinguisher system is standard. Despite its robust airframe, a heavy-duty floor with three really strong cross members and rugged undercarriage, the design team did well to hold the Beaver's empty weight down to about 2,950=3,000 pounds. When fitted with radio gear, a survival pack and two rows of three-abreast passenger seats, its weight is about 3,100 pounds. With a max. certified take-off weight of 5,100 pounds, this provides a useful load for pilot, fuel and payload of a neat 2,000 pounds. Originally, the concept was to produce a half-ton payload machine with the fuselage tanks full.
Of the 1,690 Beavers produced, the USA military purchased 968 which they called the L-20 and I have no doubt that they were, at times, flown at greater weights than 5,100 lbs. On aerial topdressing operations we operated at much higher weights with a one tonne load of superphosphate being the norm.; though I admit to carrying quite a bit more when spreading denser lime product. But most of the time we flew at a weight of about 5,700 lbs; 600 above Normal category. (I shall discuss agricultural operations in Part 2.)
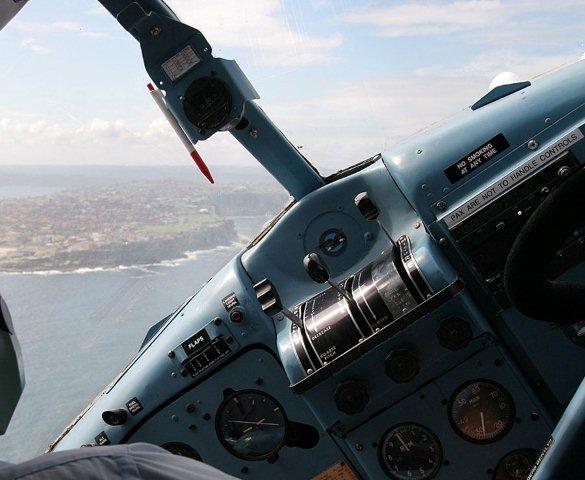
The cockpit: Let's now take a look at the cockpit and discuss some of its salient points. Step carefully onto the mainwheel (they can be rather slippery as I discovered just the once!) and climb the two steps to the small door which is fitted with an up/down sliding window. Slide onto the seat and use the adjusting crank to raise it so you can see over the left of the large cowl in the landing attitude. When I first went onto the Beaver, I was delighted at how comfortable and wide it was as compared with the Fletcher FU-24 which I had been working. Some even had fold-down armrests and its ergonomics are streets ahead of the Fletcher. Mind you, they then cost over three times more! Below the centre instrument panel is a largish handle which works the wobble fuel pump. This manual low-pressure pump is used to provide pressure for starting, when changing tanks and, in the event of an engine-driven pump failure, will provide pressure to keep the engine running. There was no electrical booster pump on any Beaver I flew.
An emergency FWSOV (Firewall Shut-Off Valve) is fitted which prevents fuel and oil feeding an engine-bay fire. Rather important should you have to discharge the extinguisher bottle. This should be lockwired Open. It is also handy for some maintenance procedures.
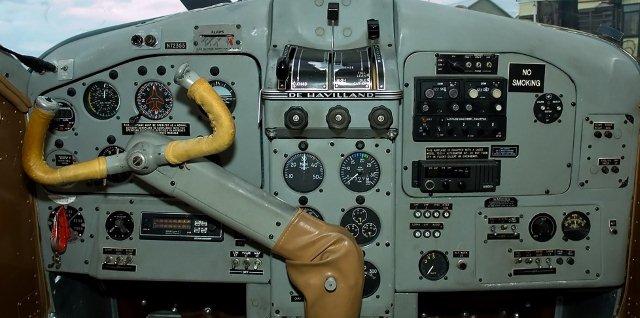
Reach down to the inside door sill and you will find a priming pump. When starting, you use the wobble pump to raise pressure to 3 or 4 PSI, turn the handle of the priming pump to unlock it and, depending on engine temperature, give it several strokes; five or six on a cold morning. The starter and booster-coil switches are below the rotary magneto switch (some may have individual up-down switches) Now, looking at the photograph, you will note the throttle on the left of the quadrant, the prop. control in the centre and the mixture to its right. (Note: earlier models have the throttle in the centre and the prop. control on the left; which I prefer. I believe that the US Military required the change)) Two types of Stromberg carburettor are in use. This image shows the type without the AMC (Automatic Mixture Control) unit. Most that I flew had the pressure-injection type with an AMC so the quadrant read Full Rich, Auto-Rich, Auto-Lean and Idle-Cutoff. With a little practice you soon learn to use the throttle and prop. levers in unison/ together with your right hand for the larger power changes such as reducing from Take-off to METO or Climb. Out of sight below is a large up/down lever which controls carburettor heat. The three large black knobs below the throttle quadrant are the friction controls for the three levers which work just fine, unlike the dinky things you find on many light aircraft.
One of the many aspects I like about the Beaver is that most of the important controls are rugged and big. You can work things wearing gloves which I often did on frosty mornings even though my loader-driver might pass ribald comments as to my "sissy" Biggles look.
To the far left is the fuel tank selector which is in an ideal location to use in a hurry. Its positions are Front, Centre, Rear and Off. Easy and positive to use which is good as, for example, if you allow the rear tank to exhaust it may take up to 13 seconds to get fuel to the carby by means of the wobble pump. Very serious at lower altitude as I found out when very new on type. That is why, in NZ, all Beavers used for agricultural ops. were fitted with a low-pressure warning system. If pressure falls to 3 PSI, a red bezel light on the panel lights and a loud horn blasts from behind the panel.
At the top of the panel you will see the flap position indicator. The Beaver is somewhat unusual in that the mainplanes are rigged at zero degrees of incidence. This makes the proper use of flap rather critical. If you move your right hand to the right of the seat, you will find a handle. This directly works the hydraulic flap pump.
Just beside it, at floor level, is a two-position selector lever for Up or Down. For busy topdressing operations this is not ideal as one has to loosen the right shoulder harness in order to lean down to use the selector. It never bothered me much due to my Neanderthal-like arms but a modification. was made to this system for ag. machines which I shall discuss in Part 2. Simply work the pump lever to-and- fro and watch the flap position indicator move laterally. The first setting is about 10 deg. and is termed Climb. It is particularly useful at high weights and best Rate of Climb speed as it reduces the fuselage "deck" angle, enhances over-the-nose visibility and makes the aircraft feel less "squashy/mushy"; particularly during heavy turns. The next setting is Take-off; about 20 deg. Then we have the Landing mark at 40 deg. (I think?) and finally Full which I think is 47 deg. I only used Full on the shortest of strips and/or when landing downwind on a tight airstrip. But the flap settings are infinitely variable so, during ag. ops, one tends to rely on feel and performance rather than sticking rigidly to the indicator settings. (more in Part 2.)
Below the quadrant is a Manifold Pressure gauge in inches of mercury, a tachometer, (the tachos. I remember had two needles; one registering thousands, the other hundreds and tens. This assisted very precise RPM setting,) Further down are the usual oil pressure, oil temperature, fuel pressure and a cylinder-head temp. gauge. Also visible are the three small fuel quantity gauges which I found to be quite accurate and reliable once one had gained confidence in them by carefully checking against one's wristwatch or cockpit clock with regard to fuel-flow. Over on the right panel is the usual vacuum gauge and a combined ampere and voltmeter. Just press the button for volts. Whilst full dual controls can be fitted, most Beavers have the throw-over yoke. Pull out the central pin and throw it over to the co-pilot. This system is better when carrying a passenger up front. The remainder are all the usual circuit breakers, avionics and light switches etc.
The powerful elevator and rudder trim tabs are controlled by rubber-capped wheels above on the ceiling. They are easy to use by raising your right hand from the quadrant and are very sensitive...no tiresome multi-winding. Well, that is probably enough to make you initially familiar with the Beaver. In part 2 I shall detail what this great aircraft is like to fly on actual operations and outline its history in New Zealand. Please forgive any minor errors as I have not flown a Beaver on topdressing operations since 1990 so my memory may be a tad hazy.
Thanks to Graeme Mills in Wombat-Land for the photo of Dick in ZK-CGX. Take a look at his most interesting site:
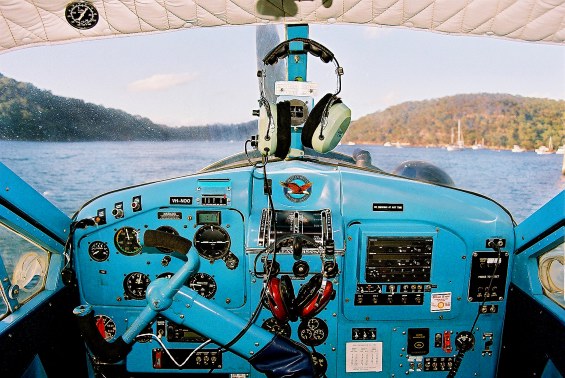
Top image: The text above that discusses the cockpit layout and controls relates to this particular image. There have been changes over the years. Some operators have moved the manifold pressure and tachometer gauges to the upper instrument panel; as an example.
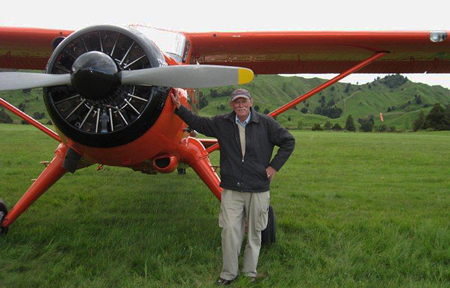
Second image: This is the Pratt and Whitney R-985 that the American EAA have on display at their museum. This is a 985 AN-1 which was produced in huge numbers. Clearly shown is the design of the cooling fins on the cylinder barrels and heads, the shrouded pushrods to the intake and exhaust valves and the ignition harness and shielded spark plugs.
Third image: This is a scanned page from an early Beaver manual or set of pilots notes. The schematic drawing of the fuel system shows, using dashed lines, a Booster Pump. I can only suppose that it was an option for an electric unit? Or perhaps a requirement for aircraft supplied to the Military?Thanks to Neil Aird for organising this as my notes had long ago vanished. Neil has the fabulous Beaver website:
Fourth image: Thanks to Lance Harding for this photograph of his father's Beaver, ZK-BXN. John Harding, who owns Rangitikei Air Services, operated BXN for many years from his Taihape (NZ) base. This view shows the compact engine installation with the exhaust collector ring feeding the one large exhaust stack on the right side to prevent glare distracting the pilot at night. I often flew with the sliding cockpit side-window down on hot days. At the top of the robust undercarriage leg can be seen the large rubber (or synthetic?) blocks which absorb the shock-loads. The two blocks are separated and 'locked' into position by a formed metal dividing/locating plate which must be regularly checked for cracks. The propeller usually fitted to Beavers has external counter-weights and the cylinder moves, rather than the piston. This is why one generally selects full-coarse pitch prior to engine shut-down...to drive the cylinder back to cover and protect the chromed piston exterior from grit. This photo also shows the wing incidence angle which, from memory, is rigged at about zero degrees relative to the longitudinal axis. So, in the three-point attitude, the mainplanes are below the stall angle. I always used a tail-low attitude for take-off. As far as I know, dear old BXN is still working hard in its home country of Canada. It is the last Beaver I flew on topdressing operations; just over 20 years ago.
|
| Wings of Time. The de Havilland Canada DHC-2 Beaver. Part Two. Agricultural operations.
Flying the Beaver and a perspective on how pre-GPS aerial topdressing operations were akin to an art form; by Mike Feeney. I must stress that I have had to abbreviate much of the text relating to aspects of job-planning and airstrip take-off and landing risk-management, as there are an almost infinite range of variations and variables regarding airstrip dimensions, slope, surface wheel-drag and braking effectiveness, property shape, third-party impingement after take-off and during initial climb-out, noise- sensitive animals (children on horseback) terrain and aircraft climb performance, wire hazards, sunglare, wind and temperature conditions, fog/cloud on target area, airstrip and enroute phase, drizzle on windscreen (no wipers) product flow characteristics, pilot experience, pilot fatigue, soil nutrient status on shaded hill-faces as compared with northern faces and farmer expectations and instructions...the list goes on depending on all sorts of factors and changing CAA, environmental bodies and Regional Council compliance requirements. (It may be alleged by a somewhat 'precious' lifestyler and his legal-vulture (I jest of course..Ho Ho! We all know that lawyers are a kind, jolly selfless band....just ask one!), to be a form of Aerial Trespass if some fertiliser dust blows across a boundary fence or into a waterway; never mind about the clouds of toxic fumes emitted by heavy trucks that blow all over the countryside day and night and seven days a week. So much for 'organic' crops that grow near highways!)
It is now over 20 years since I last carried out aerial topdressing operations in a Beaver, so one's memory can become 'hazy' on some detail. Of one thing I can be quite sure though; ag.flying, both topdressing and spraying, was by far (along with some phases of 'bush' flying in Papua New Guinea) the most demanding of assertive aircraft handling, sound airmanship and rapid decision-making that I have ever experienced. It is close to impossible to adequately explain to the non-ag. aviator just how close we were, on the poor quality airstrips, to having a take-off or landing accident. Whether we should have ever been legally permitted to operate to such razor-edge limits and margins may be argued forever. But as we did so, it is now a matter of historic record.
(Photographs, and the notes relating to them, are at the bottom of the main text).
I must first thank an old chum, John Rika, for his help in checking the detail of this article. John was, for many years, Fieldair's main checking and training pilot and has an excellent memory of operating Fieldair's Beavers on agricultural operations. I also enjoyed our hours on the 'phone recalling our younger years chucking fertiliser (fert.) over the landscape in a reasonably (and hopefully) accurate manner. This essay is by no means comprehensive as, to amplify further, would require an actual book. But I do hope that the following will paint a 'word-picture' for the readers who admire this fine aircraft and who have an interest in our agricultural aviation history. There can be few aircraft types which have had a coin minted as an appreciation of their worth to a nation's development and transport infrastructure. The Canadian Government did do this as a tribute to the grand old Beaver.
It is not my intention to detail a history of all Beavers that operated in New Zealand, but rather to look back and consider the type's introduction and role in our aerial topdressing industry. So you will find no lengthy lists of aircraft registrations and construction numbers. Others have listed those very well already.
It has long intrigued me as to why aircraft were not used for the application of fertiliser much earlier than the 1949 beginning of commercial flight operations. After all, aerial agricultural operations became well established in several countries during the 1920s; principally the USA from 1921 (dusting the boll-weevil infested cotton crops). I am certain that the idea must have been considered by many farmers as they watched the early military and aero club types flying over our countryside. Technologically, it is a simple concept. Just place a hopper in the passenger cockpit of an Avro 504 or DH-60 Moth, install a simple outlet gate on the bottom, tip some bags of fertiliser or seed into the hopper then fly across the paddocks working the hopper lever!
In 1906 John Chaytor had applied seed onto a swamp near Wairoa. using a hot-air balloon with mobile tethers. Spreading superphosphate by aeroplane was independently proposed, in 1926, by John Lambert of Hunterville and Len Daniell of Wairere. And, in 1936, Hawkes Bay farmer, Harold McHardy sowed clover seed from a DH-60 over his own land. Then, in 1947, Doug Campbell conducted the well-documented trials near Taumarunui using a DH-82.
I am quite certain that the delay was due entirely to the deep and devastating economic depression that NZ suffered from 1931, followed by the state of war which prevailed from September 1939 until the Japanese surrender in 1945. But it was not long until the RNZAF conducted trials with a Grumman Avenger and Bristol Freighter; both heavy types which were quite outside the capital resources of private individuals or most companies. This left only types such as the DH-82 Tiger Moth and some Auster models which were available and affordable.
The Beaver, which entered production in 1948, was an obvious choice, as was the Canadian Norseman. I still do not know why this fine aircraft was not used in NZ; possibly a matter of availability. Only a few operators could raise the capital required to purchase Beavers. Initially, these were Rural Aviation, Fieldair and James Aviation. The Beaver was an entirely different class of aircraft to the DH-82. Most of the early Beavers arrived over a short time period.
We shall later look at my estimate of some productivity figures which will show just how different.
Rural Aviation imported the first Beaver (c/n 89) in January 1951. This became ZK-AXK and was nicknamed "Jerry" after Jerry Hooper, the first topdressing pilot to be killed in NZ (there have been 139 since!). It crashed near Maungamahu on the 20th of April, 1954 killing Ramsay McGill.
Rural imported ZK-AYT (c/n 138) in October 1951. It was written-off at Akito (I wonder if that should be Akitio?) in April 1956.
AVL (c/n) 148) was brought in by Rural in December '51 but was sold on to James Aviation who used it until selling it to Aerial Farming in January 1959. In December '59 George Shirtcliffe was killed in it near Taihape.
Fieldair's first Beaver, AZB (c/n) 156 arrived in December 1951 and is still flying today. Their second was BBX (c/n 324) in November 1953. It also is still flying.
James Aviation received BDI (c/n 462) in July 1953 and bought BFO (c/n 609) in May 1954 and used it in passenger/freight configuration until October 1956 when it was converted for topdressing operations.
And so the number slowly grew but Ossie James became deeply involved with the Californian Fletcher company so changed over to the Fletcher FU-24 and Rural, becoming the NZ Cessna agency, used Cessna 180s in large numbers (nearly 40 from memory).
But back to the DH-82A/Beaver comparison. A hopper-equipped Tiger had an empty weight of about 1,150 lbs. Add a 200 lb pilot, 100 lb of fuel and a 550 lb load of fertiliser and its take-off weight could be as high as 2,000 lbs. The Beaver's weight with one ton of fert. is approx. 5,700 lbs; 2.85 times as much as a Tiger. With a more efficient propeller than the Tiger's fixed pitch, the Beaver's take-off thrust is over four times greater. A DH-82, hauling a full hopper load, took four sorties to spread one ton. On short-haul no-climb work, the Tiger could average about 16-20 trips per hour and the Beaver perhaps 20. So the Tiger would sow, given optimum conditions, four to five tons per hour against the Beaver's 20. But when significant distance and climb was involved, the little biplane was struggling up at perhaps 55 knots and 100 feet per minute whereas the Beaver was climbing out towards the target area at 80-85 knots and taking only 1.5 minutes to attain a 500 feet height gain. Under these circumstances, a Tiger might be able to manage only six loads (1.5 tons) per hour whilst a Beaver might manage 12 tons per hour. So, whilst the Beaver had only four times the Tiger's take-off power, it was much more than four times as productive.
The downside was its staggeringly high capital cost. Phil Lightband, who was with Rural Aviation, tells me that the first Beaver they bought cost 45,000 pounds. Using an inflation calculator, that is $2.2 million today; about the same as a new Pacific Aerospace P-750 XSTOL. A really good Tiger Moth in 1951 cost about 1,000 pounds; $50,000.00 in todays dollars (less pristine examples could be only four or five hundred pounds). To put this into perspective, Phil mentioned that the first new home they built in the early 1950s cost 200 pounds for the land and 1,500 to build. I recall that my parents bought their first home, a ten-year old State-house, a few years later for 2,000 pounds with a Govt. loan at 3% interest. An old flying chum, Jim Woodhams, recalls that, in the late '50s, their first new home in Hamilton cost 3,000 pounds. It certainly shows how grossly distorted house prices later became.
A qualified tradesman then earned about 800 pounds per annum. In the early 1960s a second-hand Beaver cost 25,000 pounds; $950,000 in current dollars. So it is undestandable why so few Beavers were in use until cheaper used machines became available; particularly after the Korean War. In Australia, (the late) Tom Watson's Aerial Agriculture eventually had the world's largest civil Beaver fleet which peaked at more than 30; so I have been told. (I have read another figure of 40).By the late 1970s, Fieldair's Beaver fleet grew to about 12 before they were progressively replaced with the Fletcher FU-24-400; not a popular change in the opinion of many pilots.
Job planning prior to GPS:
For many centuries the 'acre' was used by surveyors and farmers. We agricultural pilots used acres, chains, yards and tons as our everyday working tools. An acre is 4,840 square yards (4,047 sq. metres) and an actual square acre measures about 209 x 209 feet. But to us, an acre is perceived as a strip of land 20 chains long (a quarter of a statute mile) by half a chain wide (11 yards/33 feet). The reason for our perception of an acre is because the swath width of our aircraft was about half a chain; a little less than a wingspan of the smaller aircraft.
Application rates of superphosphate on NZ hill country tended to be about two or three hundredweight (a cwt=112 pounds) per acre. So we knew that one ton of fert. should, at 3 cwt/acre cover just under 7 acres resulting in a sowing distance of approx. 130 chains if we adhered to the 11 yard run-line separation. Ergo; a DH-82's sowing distance was a short 32 chains, a Cessna 180's 65 chains, an early FU-24 85 chains and a Ceres or a Beaver covered 130 chains. But when planning which way to fly a property, we had to try to make each load fit the dimensions of the land so as not to run out of fert. part-way through a run as, in pre-GPS times, there was no practical way one could remember just where the flow had ceased. And this is where the pilot's 'juggling' act came in.
As an example, let's suppose that the application rate was 3 cwt per acre, the payload was one ton and the length of the block was 160 chains. What one would do is slightly reduce the run-line width and reduce the flow rate to make the load fit the run length (overlap). If the property was, say 110 chains, we would slightly widen the run-line spacing and increase the flow rate. The result was not perfect but was economically sensible. The farmers knew what we were doing but rather than pay for more flying to do a double run per load to achieve a perfect result, it made sense to compromise and rely on the next spreading job to average things out. I also reasoned that when it rained on hill faces, the water would slowly dissolve the granules and the resulting solution would percolate down the hill. I actually recall one pilot drolly commenting that the sheep would kick the fert about and thus even-out the distribution pattern. I have to wonder what the boffins at Massey and Lincoln universities would have thought of our "expertise". However, I do believe that there was something in our 'gut' instincts as I have seen data on dry-matter production which bears them out. As for most farmers back then, they just wanted the fert. on before the next rains!
Anyway, when I was flying the Cessna 180 and early Fletchers I was mostly able to avoid having to fly two runs per load. But when I moved on to the Beaver, this situation changed and careful job planning became more important as two runs were often required in order to avoid opening up the run spacing too much and risking obvious 'striping' of the farm which became most evident after the next rain and could be seen by, not only the client, but one's fellow pilots. This could result in ribald comments being directed at one!
Flying a typical job:
Prior to commencing a new job, some pilots used a checklist which could vary. One that I hazily recall was WESTWAY. Wind direction and strength...Engine temps. and pressures...Strip length, slope, surface and Sunglare....Target area boundaries....Wire location and height......Adjacent vulnerable crops (spray-drift)....Y ??? I can't remember...maybe it was just to make a word or perhaps 'Yes..check complete'.
Now let's fly a typical example job. The airstrip is located on the western side of the Ruahine Ranges; east of Taihape. It is 300 yards long and slopes down at 15% (equivalent to a 400 yard level airstrip) to the north-west with the far fence below strip level and a clear get-away fan off the end so is ideal for a Beaver. I decide to fill both the front tank (29 gallons) and the rear (19 gallons). Allowing for 30 mins reserve at low cruise power (7 galls) this will leave 41 gallons for a work duration of close to two hours.
A brief exterior pre-flight walk-around went along these lines. Left tyre and brake line > left undercarriage rubber shock blocks > propeller and engine for oil leaks > oil cooler for thistle heads or other stuff > carburettor air intake clear > right tyre and main leg > right wing aileron mass-balance > elevator and rudder hinge pins > grease tailwheel assembly as required > left wing aileron mass balance > check hopper box viewing mirror > belly fuel drain cocks for water > hopper actuating rods, grease if required.
Look at windsock and ask loader-driver for a first load of 18 cwt (900 kg) to test the strip and conditions. Tell him to go to 19 cwt after first load and then full 'cans' unless I signal otherwise (with no radio comms, we used a variety of hand and finger signals; some of which may have appeared rather rude to observors).
Climb aboard (I am assuming you have read Part One so will be familiar with the cockpit) > check park brake > adjust seat > flight controls full and free (important to feel and listen for anything unusual before engine noise and vibration masks them) > master switch On > fuel tank selector to Front > magneto switch Off > prop Full-decrease (from previous shut-down) > throttle Set > mixture Auto-rich (I actually preferred Idle-cutoff and move to Auto-rich as engine fired-up) > use wobble pump to bring fuel pressure to 4 psi > prime several strokes and leave primer unlocked in case more is needed > select starter and crank through about 7-9 blades to check for hydraulicing of bottom cylinder (the starter motor has a slip-clutch so no requirement to turn prop. by hand. I never flew a Beaver with an inertia starter) > booster-coil held On > magneto switch to Both > should fire > use wobble pump as required until rpm steady > lock primer > check oil pressure and temp. (minimum of 40*C before using substantial rpm) > propeller to Full-increase > generator volts and amps > fuel selector to Rear > pump flaps to full down, then full up (a relief valve prevents over-stressing pump O-rings) > then to Climb > increase manifold pressure to ambient for pressure altitude and check Reference rpm (printed on a card by engineers) > check propeller control > check magnetos > check carb. heat > check idle rpm (can't remember...but low..500 rpm?) > taxi to edge of loading area and ensure no sheep/cattle/horses/bikes/fert. trucks/kids on strip > select a distinctive distant landmark for a take-off direction marker > taxi to loading position taking care not to turn too rapidly (bad news to spin on a wheel) with power on to avoid placing excessive gyroscopic stress on supercharger bearings > work hopper control to clear any residual fert. and close as loader moves in.
Pre take-off checks. Elevator trim > mixture Auto-rich > prop lever full-increase > friction controls adjusted > fuel selector to Rear tank > carb heat Cold > flap selector to Down (some operators fitted a bicycle brake handle to the flap pump handle and spring-loaded the selector to the Down position so to pump flaps up you squeezed the lever to raise the selector to Up. I used these in Aussie and recall that the cable tension was important if it was to work reliably) > flaps to Climb > flight controls full and free > harness adjusted > click load-counter > write next refuel time on back of left hand > check loader clear of tailplane > a glance at temps and pressures > toes on brake pedals > open throttle > check windsock > brakes release > throttle to 36.5 hg (many Beavers had an adjustable metal gate so you could slide the lever to take-off power without looking at manifold pressure gauge) > a glance to check rpm at 2,300 > keep straight with bags of rudder and a touch of brake as required > 45-50 knots > pump flap to Take-off to assist in raising. tail slightly > looking for 60 knots by about 60% of strip gone > right hand to hopper lever for jettison decision > 65 knots > end of strip > sinking out of ground effect > 80 knots > flap to Climb > throttle and prop lever slowly back to climb power of 30 hg and 2000 rpm.
On a really good and long strip I would usually set flap to Take-off and not fiddle with it. John Rika tells me that during his period with Fieldair, they used an intermediate power reducton after take-off; somewhat more than the Climb setting; perhaps to 32 hg and 2,150 rpm. I don't recall that and just remained on full power until ready to slowly reduce to 30 hg and 2,000 rpm. I think the METO setting that John recalls may have been a Company figure that was part of an application to Civil Aviation to have the time-between-overhauls increased from the early (for ag. engines) 600 hours; 650 with an extension if a compression check proved satisfactory. P&W R-985s used for normal operations have a much longer TBO which may vary from country to country...1,500 hours from memory; maybe longer with the cylinders and valve gear being 'top-overhauled' along the way.
The block we are treating is behind the airstrip and slopes up to the bushline. The lower boundary is about half a mile behind the loading area and is 50 chains long. This means that two sowing runs will suffice by widening the run-lines slightly. To minimise the flight time and climb period at max. weight, I carry out a curving climb at 85 knots to the right to commence spreading along the bottom boundary fence. If I get it right, half the load will be gone at the end of the run and thus greatly enhance performance during the left climbing 180* turn to pick up the second run-line about halfway up the slope (race-tracking). As I sow, the airspeed passes 90 knots so I can retract the flaps and bring the power back to 27 hg and 1800 rpm. I run out of fert. shortly before the boundary but this will be fixed as the next loads will be closer to a ton.
Then it's a steepish descending left turn aiming for an oblique close base turn with flap going out and power coming back to curve onto the strip at about 75 knots > prop to fine > flaps to 20* > brakes checked > flap 30* > speed bleeding off to 55 knots > flap to about 40* (maybe Full when landing with tail-wind) > nose coming up.. up...up > a touch of power > a tail-low wheeler or three pointer > tailwheel down > flaps up > flap selector Down > pump down to about 10* > turning > indicate to driver 'full cans' and stop on loading position > toes on brakes > trim > mixture > prop > fuel selector and contents > carb heat cold > load counter > watch loader back out > power going on > check direction landmark (initially you can't see the strip at all) and roll > feeling/sensing performance with greater load > a quick pump of flap to 20* > lift-off almost at end > greater sink but comfortable > flap to Climb > power back to Climb > curve onto next run-line > note number of fence posts from first run > note a water trough > a small land-slip > clump of thistles > far boundary approaching > ease forward on yoke to lower "G" > snap hopper lever closed > roll into climbing left turn > pick up new run-line > roll level crossing fence > open hopper > looking for landmark on far horizon > passing small patch of scrub > check mirror for hopper flow > work hopper lever slightly to 'feel' remaining content weight > flow stops before fence > clean-up runs at end of job will fix that > check carb. inlet temp gauge..if within icing range, use full heat to ensure no ice (if particles break loose they can ablate supercharger impeller) and so the morning proceeds. The wind picks up from the north so I track back over the loading area to do a slipping right base turn into wind (dislike turning downwind whilst washing-off airspeed).
All topdressing pilots fear running short of fert before the entire property is covered. My simple insurance against that was to divide the area into half, then quarters, on an aerial photograph or farm map or make a sketch map in my notebook. So if the job was 50 tons, by a quarter across you should have sowed 12 tons, at halfway 24 and so on. The remaining fert. was used for tidy-up runs. It is quite amazing how one's mind can retain a clear picture of the previous run markers used and, when race-tracking, there were two runs to recall per load. If forced to cease working due wind, cloud or impending darkness, I would sometimes note a landmark on my map or sketch...simple items such a gate, trough oddly shaped fence post...anything at all really. And, of course, if one had two or three loaders on strips and were moving from job to job due conditions or fertiliser delivery delays, well then I was careful to ensure that I knew where I had ceased sowing on the various incomplete jobs..
Flying nice straight runs was ideal, but much of our hill country does not permit that. With straight-line flying it is relatively simple to decide on a new start point each time and for the finishing point I used to pick a landmark as far away as possible as, from simple geometry, you are going to be quite accurate and can cross-check your lateral progress by various items along the way as you could rarely sight your precise end of run point until much closer (well I couldn't). This was not possible when a job involved curving ridgelines and hill faces. With these you have to gain a 'feel' for the terrain and follow the contours; the 'grain' of the landscape. With really steep faces, the slope may be taken into account if you were a 'fussy' type, as the acres of pasture will be greater with relation to a flat surface. It works out as the natural cosine of the slope With a 35 * face the actual acres will be the plan view plus about 20% and 30% more when spreading a 45* face (rare).
Farms come in many shapes and sizes. On a really large property you had to divide the land area into smaller blocks and fly it as though it was two or more separate properties in order to minimise the flight time and maximise tons per hour. Basically, the objective is to maximise the percentage of the sortie elapsed time with the hopper open and minimise the ratio of non-sowing time. Simple in concept; not so simple in execution! Sometimes a block might be tapered or near triangular. In these cases, to avoid runs becoming shorter and shorter, one would begin on a straight(ish) fenceline and then very gradually open-up the run-line at the broader end so as to progressively straigten things out so as to finish the job along another straight line but on a rather different heading. A certain amount of 'cunning' was required in such cases to avoid excessive overlapping, but I never had a farmer question what I was doing. They would take a look at the spread pattern after you had left, or during the job, and must have been reasonably happy with the granule count per square yard. I can remember a few farmers who always seemed to have some task or other that, by coincidence, just seemed to take them almost directly under the aircraft. This never bothered me and I would give them a cheery wave.
There are other factors to account for such as sowing up slope at 80-85 knots is very different from downhill at 110-125 knots. The hopper opening must be less when slow and opened up more when fast to try and maintain the desired rate per acre. The difference could be as much as 50% A head or tailind component could exacerbate this situation so groundspeed could vary considerably; perhaps by as much as from 70 knots upslope and into wind and 130 knots downhill and downwind. If this was not compensated for, the rate per acre could be almost doubled on the slow run and halved on the fast run. A feel for this grows with experience. Not infrequently, the product being spread may vary in flowability due moisture and lumps. Frequent glances at the mirror provides a picture of the flow characteristics. Again it is just the level of pilot experience that makes the job work. If you observe a new chum at work, he is as busy as a one-armed paperhanger; but watch the same man in the cockpit a year later and all is happening smoothly and with a minimum of fuss and perceived activity.
After about 45 minutes on the rear tank I usually changed to the Front and flew a further 1 hour 10 minutes. On tighter airstrips I would operate on the front tank only to maximise payload. I recall the fuel gauges as being quite accurate and you could tell from the way the needle moved/jiggled whether they were working ok. You can not use a dipstick so must rely on filling to the top of the filler neck and on a combination of time and the gauges. I once ran the rear tank dry after take-off but the low fuel pressure warning horn enabled me to change to the front tank and use the wobble pump in an energetic manner!
Fuel consumption per hour could vary somewhat depending on the amount of climb and total sortie time. More times on the loading area per hour meant lower consumption. I never used Auto-lean when topdressing as it would be just too easy to forget to return to Auto-rich for the next take-off and damage the engine due detonation. I generally used it for all but the shortest of cruise trips. If one used about 50% power for cruise the consumption was quite low at 225 bhp x specific fuel consumption of 0.45 pounds per hp per hour = 102 lbs/hour divided by specific gravity of 7.2 = 14 Imp. gallons per hour (54 litres per hour).About 2 nautical miles per litre. But on climb power in Auto-rich it was much greater at about 30 galls/hour.
Well I hope that my description of a typical Beaver topdressing job has helped you understand the aircraft a little more. The sorties I described above would have taken over four minutes from open throttle to open throttle. This would be comprised of about 55 seconds for the take-off run, landing roll and loading time, 70 seconds to turn and climb to the start sowing point, sowing time for two runs 55 seconds, reciprocal climbing turn 20 seconds and about 45 seconds back to the strip and turn onto final. Total = say about 4 minutes and 10 seconds. That would result in 14 loads per hour.
On many blocks there would be clumps of scrub or trees so one would shut-off while crossing these which meant that there might still be some fert. in the hopper at the end of the final run. This was handy for 'filling in' small corners and odd-shaped pockets of pasture such as are found along a winding road or river boundary. The whole process could be likened to a child's 'colouring-in' book, The object was to fill in all the space inside the boundary edges and not stray outside them.
So, as you can see, the Beaver is a rather 'busy' aeroplane to operate on short-haul ag. operations yet it seemed a relaxing and easy machine to work. The flight controls are light and responsive...perhaps a little slow in the roll at low airspeed but quite adequate. With flap extended and the ailerons drooping there is some adverse yaw but leading with rudder eases that and I never really thought anything of it. The stalling speed when light and with landing flap was below 50 knots and I can't recall really noticing what it was to be frank. I never noticed any significant tendency to drop a wing at high angle of attack. It was easy to keep straight during take-off and landing and did not seem prone to ground-looping despite the removal of the tail-wheel steering gear on ag. Beavers. One always felt at ease and 'at home' in that comfortable working office. When executing a reversal turn, I usually used a lazy style of wingover which eased the "G" stress on both myself and the aeroplane. I never liked 'wracking' it around in a level steep turn...didn't feel natural...at least to me. Some might not agree with me...so-be-it!
The only problems with the Beaver that I can now recall experiencing were: A cracked cylinder head. A fairly straight-forward job to replace it with an overhauled built-up cylinder assembly. A tail-wheel assembly failure. Flew it to Gisborne and had no problem taxiing to the hangar using brakes to keep rear fuselage off the ground. A flap-pump failure and unable to raise flap from the landing position. No problem taking it off from a strip at Mahia and flying the short distance to Gisborne at slow airspeed. Oil temperature climbed but stabilised well below red-line. Rapidly climbing oil temperature due oil cooler packed with thistle heads. My fault. Should have had them mown or crushed them down with a tractor or loader wheels. A propeller seal weeping and spattering windscreen. And a slightly scary aileron "buzz" at higher airspeed. Aileron cables needed re-rigging. And that is about it.
I was often asked whether I ever became bored with the repetitive nature of the work. I was never bored, often tired, but never bored. Things were constantly changing, The run-lines, the wind, the temperature and there was always something to observe as one had an overview of all the various activities going on. Farmers going about their tasks, the schoolbus picking up all the local children, trucks delivering fert. or picking up stock, shepherds and fencers working. And all the time the green landscape flowing past underneath and around one. I was content being alone in my little 'office' with the engine and prop. producing their (mostly) steady and comforting sounds, One got to know every detail of the cockpit and every characteristic and foible of the aeroplane. On approach or take-off you could sense the smallest of wind changes with no need to refer to the windsock. Just the merest glance at the blades of grass moving or the pattern of the ripples on a dam would act as an indicator. It is hard to explain just how totally in tune with the aircraft one became. I mean how does one 'sense' a down-draught on short final approach and apply power even before the aircraft actually enters that air? But I hope the above has gone some way to explain the life of an agricultural aviator.....
If you get the chance, I suggest you try and spend some time on an airstrip when an aerial topdressing aircraft is working, After a while you will begin to discern a pattern, an activity 'flow' which no words can explain.
So cheers and chocks away to you troops,
Mike Feeney...dinosaur ex. Beaver ag. pilot.
Hamilton, New Zealand,
February 2011.
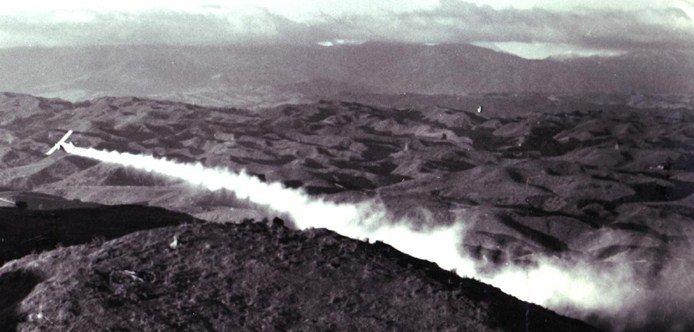
TOP PHOTOGRAPH: This magnificent historic photograph is from the collection of one of New Zealand's earliest Beaver pilots; Phil Lightband. It is of a Rural Aviation Beaver, ZK-AXK, during a long spreading run over typical NZ hill country in the early 1950s. To me, it embodies the 'atmosphere' of a Beaver operation...the vast sweeping landscape of ridgelines and valleys amongst which we worked. As I look at the Beaver rolling into a left turn, I can almost feel the slight buffeting due to the hopper doors being open and the airflow over the open hole in the upper fuselage. It brings back memories of how, during a left turn, I often looked back to examine how the wind was effecting the long white trail that one was laying over the landscape.
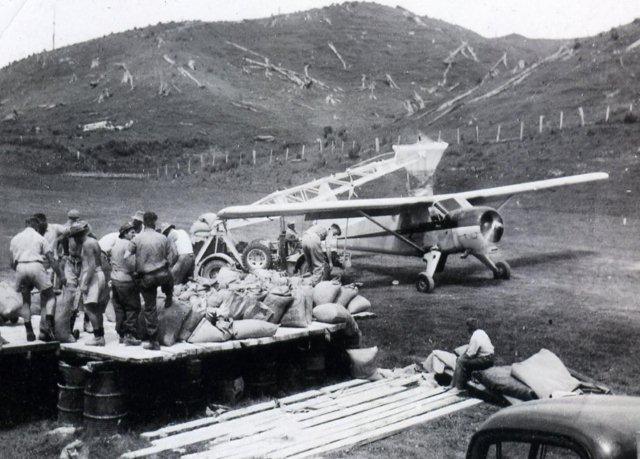
SECOND PHOTOGRAPH: This photograph shows Rural Aviation's ZK-AXK being loaded in the early 1950s. Prior to the introduction of bulk superphosphate which was trucked to the airstrip and tipped into a bin, 187 lb bags were used. 12 of these equalled a ton. When the aircraft arrived, the farmer and his neighbours all worked together to empty the bags into the loading vehicle's bucket which was then driven in over the aircraft's hopper opening. It was a busy scene and required a fair degree of strength. I recall some farmers laughing at my boyhood efforts to handle one of the weighty bags which I could scarcely move, let alone lift! But, like the lad in this photograph, I enjoyed keeping out of the way and watching the operation (and getting covered in dust from the aircraft's propeller wash). This evocative photo is from Lou Forhecz's collection but I don't know who took the shot or where it is.
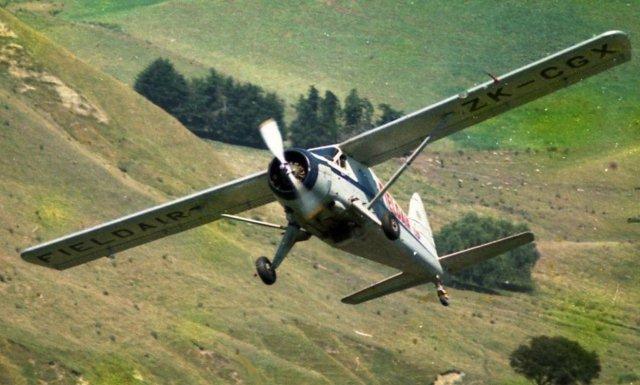
THIRD PHOTOGRAPH: This is my old chum Dick Beattie in ZK-CGX climbing up a steep hill-face. He would have been converting surplus airspeed into height and would have been pumping down some flap to assist. The Beaver was quite adept at clearing obstacles. For example, one could head straight towards a row of trees and sort of 'levitate' over them by holding the nose attitude level and pumping some flap out. This was taken in 1965 by Mark Pothan.
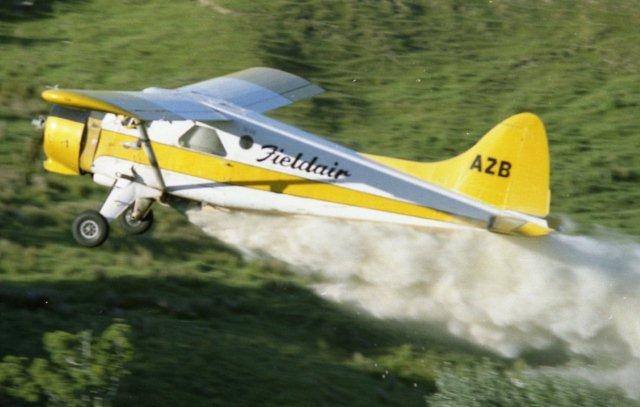
FOURTH PHOTOGRAPH: And here is Fieldair's first Beaver, dear old AZB, chugging its way along in the distinctive attitude Beavers have when heavy due to their low wing incidence rigging angle. The use of the Climb flap setting below about 90 knots lowers the nose somewhat. Thanks to Graeme Mills and his excellent website which has an extensive collection of NZ ag. aircraft. take a look at:
Another great Beaver site is Neil Aird's: www.dhc-2.com
He has a huge collection of Canadian and world-wide Beavers.
FIFTH PHOTOGRAPH: And finally, to conclude this two-part study of the all-time best single-engined utility aeroplane the Western world has enjoyed, I have selected this view from the cockpit as it conveys something of the 'feel' and 'atmosphere' that Beaver pilots perceive as they go about their daily lives in this truly splendid working machine.
|
| Webmaster note: My sincere thanks to Mike for letting me publish his essay. We will look forward to any other "Parts" he may add. Thanks Mike!
You can read more of Mike's writings here. www.flightglobal.com/dakota67 |